Thursday, November 29, 2012

Tucker: Designing Your Own Ornament


Even with several hundred patterns, sometimes I just don't have what I want for a specific person.  That's the case with Naomi this year.  Her first ornament was the nurse that I did when she finished college.  She became a labor & delivery nurse, so her second ornament was the Blessed Event stork that added a baby to.  Last year, she received my personalized version of Blushing Belinda to commemorate her wedding.  This year, having already covered major events and careers, I was at a loss.  And then I thought of Tucker. 


Tucker is Naomi's and Dave's new and much beloved King Charles Cavalier Spaniel puppy.  I thought she'd like  an ornament that looked like him . . . . and I thought YOU might like to see how I go about creating an ornament from scratch.

I've said many times that I can't draw.  Not even a little bit.  But I'm a pretty good copier.  The first thing I do is go to Google and do an image search.  In this case, I searched for "cavalier spaniel clipart."  I always add "clipart" to my search to eliminate all the photos.  I wound up with this.


Things like this are too realistic for my meager artistic skills to adapt.


This is a little too cartoon-ish and not what I want.


This is perfect!


I imported that into my Print Shop program.  It has visible rulers, so I'm able to scale it to the size I want.


From there, I adjust the tint scale to about 30% to lighten it to where it's faint, but I can still see it well enough to make out the features.


Then I print a copy.


Next, I use a fine point Sharpie or other felt-tip pen that will bleed and I trace right on the printout the paper of what I want the finished ornament to look like.  I leave out tiny details and things I plan to omit, like the shagginess of the fur, the package, or the little tongue.


Then I flip the page over and I can see where the ink has bled through.


I trace right over the lines I drew from the other side so I have a nice outline to work with.


(Because I'm a little OCD, I scanned it and reprinted it so it was facing to the right like the original drawing.)

I start thinking about how the pieces need to be designed so that things can be tucked under and inside other things . . . . like the tail or the front paw.  I draw little dashed lines to indicate how I need those pieces to be cut.


Once I do that, I re-scan it . . . put it back into Print Shop . . . make sure it's the size I want . . . arrange it in one of the upper corners of the page    . . . and print TWO copies.  I tape one copy to my tracing surface.

In this picture, I'm using an acrylic table that attaches to my sewing machine and I put a light under it.  That's because I was working at night.  In the day, I'm too lazy to drag all that out, so I just tape it to a window.


I lay the second copy over the top and start tracing the individual pieces at the bottom.


Here's what it looks like when I'm finished.  The sheet on the right is the one taped to the tracing surface.  The sheet on the left is the one I traced on.


At this point, I scan the page again.  I do this for a couple of reasons.  1) I like to have a copy saved to my computer. 


2) I like to put it back into Print Shop and add labels to the pieces.


So here's what I wind up with:


And that is how I go from this:


To this!


Saturday, November 24, 2012

Sandy, Donkey, and Kristabelle

A few years ago, I started making the nativity ornaments for my friend, Lisa.  The first year, she got the three kings.  I did them first because Lisa is half Puerto Rican and she celebrates Three Kings' Day in January.  These were one of my very first posts to this blog!  The second year, I made the holy family for her.  I got behind on ornaments in 2011, so I didn't get any made for her.  (Oh, the shame!)

This year, I decided to add some animals.  I was going to do a donkey, a camel, and a cow.  When I looked through my patterns, I couldn't decide which camel to make since I really liked both of the patterns.  I wound up doing them both and scratching the cow.  I did a Google search for "nativity camel" to get inspired with some ideas for dressing them up a little.  Here are my finished products.

DONKEY


I didn't make any changes to him.  He was very quick to stitch up.


KRISTABELLE


I added a halter to her face and neck.  In the original patterns, she's wearing a Santa hat.  (I don't know why.)  I ditched that and borrowed the ears from the pattern for Sandy.


 SANDY


On the pattern, there's a little point on her butt that's supposed to be a tail.  I decided to give her a bigger tail, so I made one like Kristabelle's.  Then I promptly forgot to stitch it on!  I didn't realize it until it was too late.  Sandy will just have to be tail-less.  I added some fancy rugs/blankets/robes/whatever you want to call them and copied the fringe from the Donkey pattern.

I think these will make a great addition to Lisa's nativity collection!  Next year . . . a shepherd and sheep!


Monday, November 5, 2012

Little Mermaid

This is my latest original design.  I created her especially for one of my best friends, Mary.  (Mary's maiden name is Fair and when she was young, kids called her "Mary Fairy."  I like to call her that, too!)  She is the mother of Kelly, who receives the marching band bears each year, and Luke, who is the owner of last year's "squirrel in aviator sunglasses" and this year's Pittsburgh Steelers football player.

One year, we were talking about the various ornament patterns and Mary said, "There should be a mermaid!"  And she thought there should be a clam, a lobster, and other assorted sea creatures.  Our families vacationed together in Holden Beach, North Carolina this summer and we were picking up shells.  I kept seeing all these little scallopy shells and had a flicker of creativity and decided I could use them as the bathing suit top for a mermaid.  I brought a bag home of various sizes.  It was hard to find two that matched in terms of size and shape.  They were all tan in color and when I put them on the ornament, she looked naked!  I decided to paint them instead.

As I've said before, I cannot draw.  Not even a little bit.  But I'm a really good copier!  I started my search for mermaid clipart on the web.  This was the first image I came to that I liked.  I thought this tail looked workable.  (Check her out -- she even has the shell bikini top!) 


That hair looked problematic to me.  I couldn't figure out the engineering of it with it dipping down behind her back.  Back to the web for some suitable mermaid hair.  I found this image and was kind of taken with the flowing hair of the mermaid on the bottom.


I figured if I had the tail and the hair going the same direction, the weight would be unevenly distributed and it would cause the ornament not to hang straight . . . . so I flipped the tail in the other direction.

I wanted something fancy in her hair, but couldn't quite decide.  I remembered the flower in Leiloni's hair and how cute it was, so I went back and took a look at her.  (Incidentally, I used Leiloni's torso!)  I decided I wanted a little more than just one big flower, so I did several.  I also thought it would be cute to have a starfish in her hair and because my drawing capabilities are SO nonexistent that I can't even scribble a starfish, I even found a graphic for that.


I won't hold you in suspense any longer . . . here she is!


I covered the whole tail with green sequins.  I did not use beads.  (If you've done any Bucilla kits, then you know what I'm talking about.)  I started using a green bead on each one, but I just didn't like how it looked.  I'm much happier with just the sequins.  It looks scalier.  I used three flowers in addition to the starfish.  Each flower has one tiny bead in the middle and the starfish has three.  I included the pieces for the flower and the starfish on the pattern, but I didn't include them in the drawing of the finished ornament.  When I did the pattern, I wasn't sure how I would arrange them.  You can arrange yours however you want!  I also included a pattern piece for a felt bikini top in case you don't want to use shells or don't happen to have any handy.  And yes -- that is a little tan french knot for a belly button!

Friday, November 2, 2012

Miss Greenland

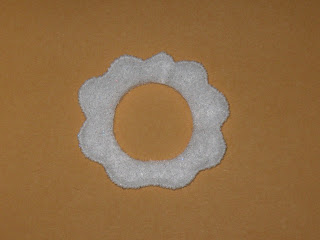
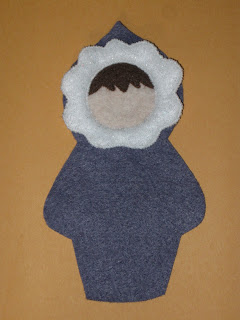
These go straight to my top ten list of favorite ornaments!  They are SO cute and really very easy.  Ouida and I had a conversation about how best to negotiate that fur trim -- especially around the face.  I didn't just want to stitch it all down to the ornament because I didn't think she'd have any dimension.  With these pieces being so simple, I wanted to give her a little something special.  Ouida suggested fake fur, which I was solidly in favor of.  The problem, however, is that I had no fake fur in my possession and had no trip to the fabric store in my immediate plans.  I opted for glitter felt instead.

Rather than just stitch the felt to the ornament, I decided to stitch two layers of glitter felt together.  For the face piece, I stitched around the outside edge first.  Then I stitched through the inside edge as I was attaching it to the face.  (Does that make sense?)  In other words, the fur is attached to the ornament in the center of the piece, but remains free on the outside.  That made it puff out a little and gave it some dimension.  For the lower fur piece, I stitched it front-to-back all the way around and then just glued it on when I was finished with the ornament.

Several of you have emailed me with construction questions, so I'd thought I'd do a little step-by-step guide with photos for this one.  Captions are underneath the photo they accompany.


I started by stitching the hair to the face piece.


 Next, I did step one of the face fur piece.
I stitched two layers of glitter felt together around the outside edge only.


 I trimmed a little off the face piece -- about 1/8".  Because I'm not stitching the face fur piece to the ornament around the outside edge, thus concealing the edges of the face, it needed to be a little smaller or it stuck out too far and was visible.


 I needed to do a test run to be sure I had the face piece in the right place before I stitched it.  I laid it on there and pinned it.


Then I laid the fur piece over the top to be sure everything
was centered and where I wanted it.


 I stitched the face piece to the body all the way around.


 Next, I laid the fur piece on top of the face.  Remember -- it's already stitched around the outside edge.  I pinned it in four places and then proceeded to stitch it to the body.  At this point, I'm actually stitching the fur piece shut on the inside curve while stitching it to the body at the same time.  It is not stuffed -- just two layers of felt that have been stitched together.  This means that I am stitching through 4-5 layers of felt at the same time:  the body, the face, two layers of the fur, and sometimes the hair.  This is not difficult -- don't let it scare you!  I took lots of stitches and pulled as tightly as I could without breaking the thread.


Next came the face.  I just used two strands of regular thread.
I did not draw it on there -- just did it freehand according to the pattern.


Next came the little mittens.  If you look on the left, you can see that it didn't line up perfectly.  That's okay -- I'll fix that in a minute.  I just lined them up as best I could and stitched them on there.


 When I finished stitching them on, I turned it over to the back.  Now you can REALLY see the imperfection!  Because I was ultimately going to line up the front and back body pieces to stitch it together, I wanted the mittens to line up with that piece, so I trimmed off the excess.


 See?  Much better!


 Sometimes when I have two layers of felt on an outside piece, I trim away the underneath. That keeps me from stitching through 4 layers of felt when I stitch it front-to-back.


 The final piece on the front was the shoes.
Time to go to the back!


 I stitch the dates on the back of all my ornaments.  Nothing fancy:  just a single strand of thread in a contrasting color.  I'm always amused by how my zeroes turn out.  Sometimes they're nice and round . . . sometimes they're blocky . . . and sometimes they're octagonal.  Can I tell you how much I'm dreading the 3 for 2013?


 Shoes on the back!


 And now the journey of finishing begins.  It's always a dilemma about where to start the closing stitching and where to leave the opening for stuffing.  On an ornament like the Viking, it was a no-brainer.  That shield was going to cover up part of the body, so I put the opening there.

For people ornaments, I generally like to stitch and stuff as I go.  It's hard to stuff an entire ornament from one little hole.  For this one, I decided to stuff from the bottom.  I started above the mitten on the right and stitched up the arm, around the head, and back down the other arm to the top of the other mitten.  Then I stuffed the head and neck.


 To finish, I stitched each side from the mitten down to the top of the shoes. Then I stuffed the lower half of the ornament.  Finally, I stitched the shoes almost completely, finished stuffing them, and closed her up!


 I stitched two layers of glitter felt together front to back -- again, no stuffing. That glitter felt is a little thick and coarse anyway, so it's got some dimension to it.


 I used my hot glue gun to attach the fur to the ornament.


 And for the final touch, I added a little sparkly pom-pom to the hat.  You don't have to do that.  She looks just as cute without it . . . . or you could even punch a circle from whatever you use for the fur.  This purple one is for Brittany, my longest-running piano student.


 The turquoise one is for Taylor, another of my students.  This is her favorite color.


 Here is Miss Greenland with her first runner-up!


And finally, here she is with her faithful sled dog.  This is for Taylor and her brother, Ethan.  This pair is most definitely on my immediate to-do for 2013 for my personal collection!